- Downloaded
- 118.2 GB
- Uploaded
- 42.2 TB
- Ratio
- 365.53
- Seedbonus
- 1,878,981
- Upload Count
- 0 (0)
Member for 9 years
I take no credit for this, but @johnwalked requested Photoshop and others tutorial
Here you go my Fam. Yep, that's right, starting with the basics. This is one of many to come.
Here you go my Fam. Yep, that's right, starting with the basics. This is one of many to come.
If you want to learn Photoshop, the best place to start is to get to know the Photoshop workspace or interface. Photoshop is jam-packed with tools, panels, menus and options.
It is no wonder then, that many people feel overwhelmed when they are getting started. This guide shows you where everything is with links to more in-depth tutorials on tools and panels.
The Photoshop interface and workspace hasn’t changed much between versions. So even if you have an older or newer version of Photoshop, this is all still relevant.
Meet the Photoshop Workspace
To get started open ANY image in Photoshop by choosing File > Open and pick any image you want from your computer or hard drive.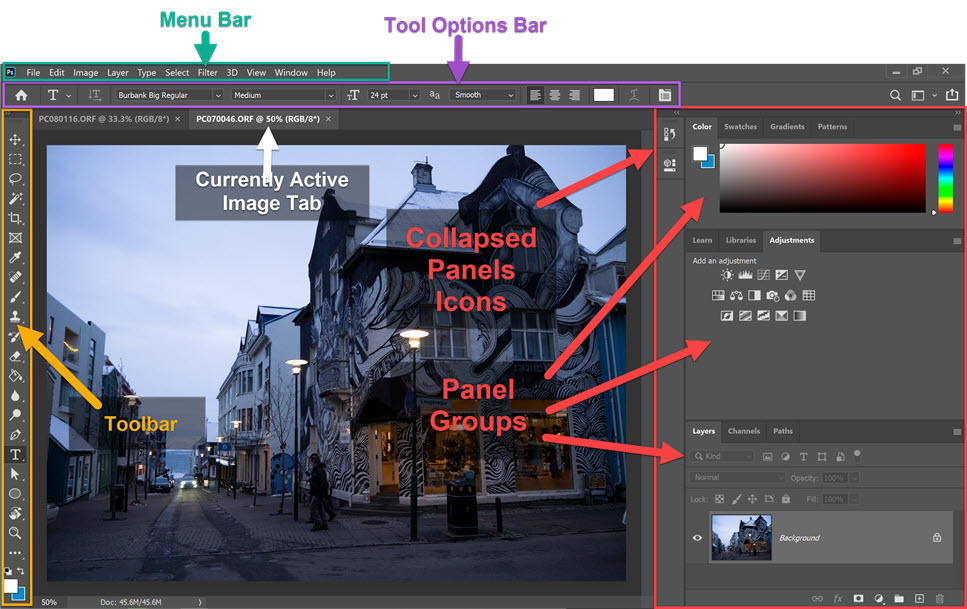
When you open Photoshop, it should look a little bit like the screengrab above. Yours might look slightly different, but it should be fairly similar.
Your opened image sits in the document window and you can open multiple images in Photoshop at one time. In the example above, I have two images open and I move between them by clicking on the name tab.
Menu Bar
The menu bar always sits at the top of the screen.There are 11 menus with many options underneath each.
Click on each menu item to see what’s available. You’ll notice some options are greyed out
which means they are not currently available.In the example here, you can see the contents of the Filter menu. This has several sub-menu items – 3D, Blur,
Distort and Sharpen to name a few. Each one of those items has its own sub-menu.As you can see there are many commands available under the menu bar.

Photoshop Toolbar
The toolbar sits on the left-hand side of the workspace and it holds the tools we use to create, edit, manipulate our images.
We can move it freely around and can view it as a long, skinny, single-column toolbar, or as a wider, shorter, double-column toolbar.

Tool Options Bar

As the name suggests, this bar gives us options or settings that we can apply to whichever tool we are currently using.
The options are context-sensitive, so for example, if you are using the Type tool the options which appear in this bar will be exclusive to Type.
If you are using the Paintbrush tool, you will see options only for controlling the Paintbrush.
Photoshop Panels
Panels sit on the right-hand side of the screen, and like the toolbar, they can be dragged out and moved freely around the workspace. They provide lots of extra functionality.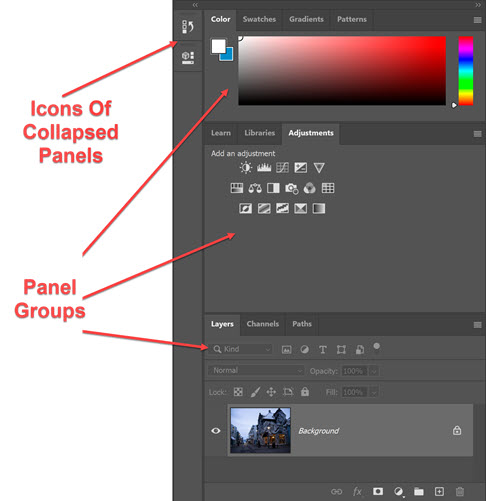
That’s a brief overview of the Photoshop workspace.
How To Use Photoshop Tools
Just like an artist’s work table, the toolbar holds Photoshop tools. It is the long, narrow palette on the far left side of the work area contains the tools you’ll use todraw, paint, erase, and do tons of other things whilst working on your image
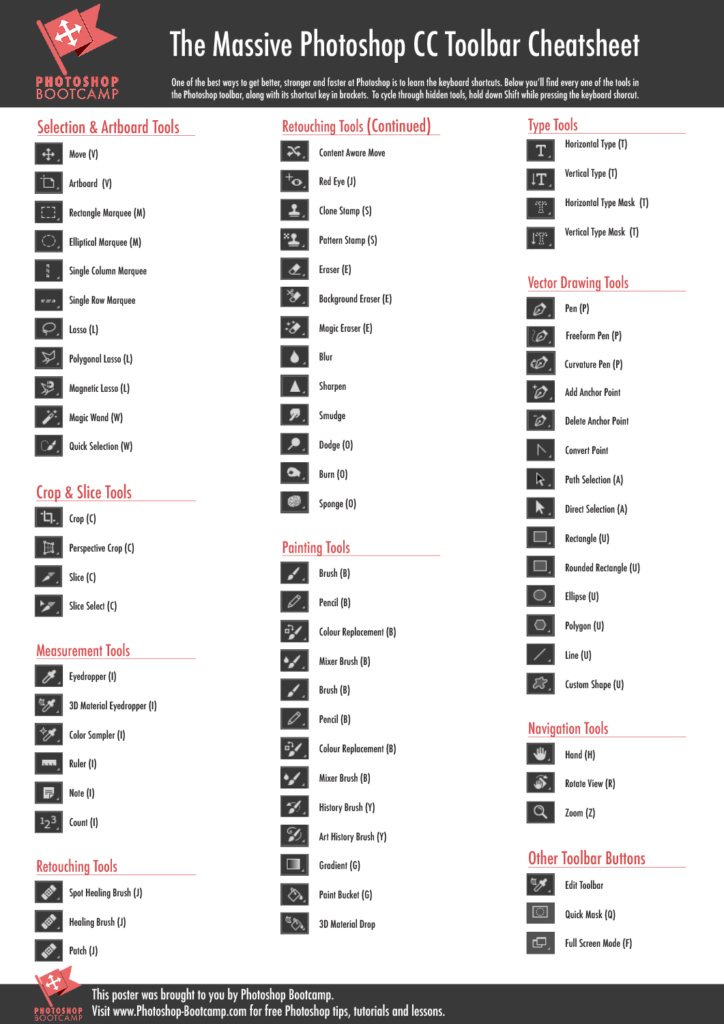
Let’s start off by taking a closer look at what’s actually in the toolbar. The tools can be broken into several distinct categories. This will help you find them when you know what kind of tool you need. The illustrations below show an overview of the toolbox, with each tool available and its shortcut key.
I strongly encourage you to start making a mental note of the shortcuts. It’s one of the best ways to speed up your workflow in Photoshop.
Selection and Crop Tools

Painting and Retouching Tools

Vector drawing and Type Tools

Navigation Tools

Color Selection

Quick Mask and Screen Mode

How to use Tools and the Toolbar in Photoshop
To select a tool, simply click on that tool in the Toolbar.When you hover your mouse over any tool in the toolbar, a tooltip appears showing you the name of the tool and the tool’s keyboard shortcut.
This is very handy when you forget what a certain tool looks like when you’re learning Photoshop.
It’s worth making a conscious effort to learn the shortcuts as it speeds up your work enormously. Some of the shortcuts are really easy
to remember such as Z for the Zoom tool or E for the Eraser. So instead of clicking on the tool in the Toolbar, just press the letter on the keyboard.
This will dramatically speed up your workflow as it lets you change tools without taking your hands off the keyboard.
ALL THE TOOLS, ALL THE SHORTCUTS
Hidden Tools
Wherever you see a little arrow on the bottom right of a tool in the Photoshop toolbar (or any Adobe application for that matter), it means there are other “hidden” tool choices. Hidden tools are accessed by clicking and holding on that tool. As you hold, a fly-out set of tools will appear giving you access to all of the hidden tools under that particular tool. In the example below, you can see that by clicking and holding on the Magic Wand tool, the hidden Quick selection Tool becomes available.
To quickly cycle through hidden tools, hold down the Shift key and tap the tool’s keyboard shortcut that appears in tooltips. For example, to cycle through the Brush, Pencil, Color Replacement and Mixer Brush tools, you would press B to select the first tool and then hold down Shift and press B again to move through that particular set of tools
******************************************************************************************************************************************
How To Use Panels & Customise Your Workspace In Photoshop
In this short tutorial for Photoshop beginners (or anyone who’s a bit rusty using it), I’ll show you how to use Panels and set up your own custom workspace.We use panels all the time as they provide extra functionality. They are an important part of the Photoshop workspace and they can be moved around, resized, collapsed to icons and hidden.
Panels and Menus
At the time I am writing this, there are over 30 different Panels in Photoshop. These range from Color and Swatches panels to Layers and Character panels.Each panel has its own unique function that helps up create and modify images.
As you can imagine, 30 panels would take up a lot of space in your workspace, so luckily we can customize their size and location and can hide and reveal them as needed.
When you’re happy with your panel layout, you can save the setup as a workspace.
Let’s get started with working with panels. Make sure you have an image open in Photoshop as you follow along.

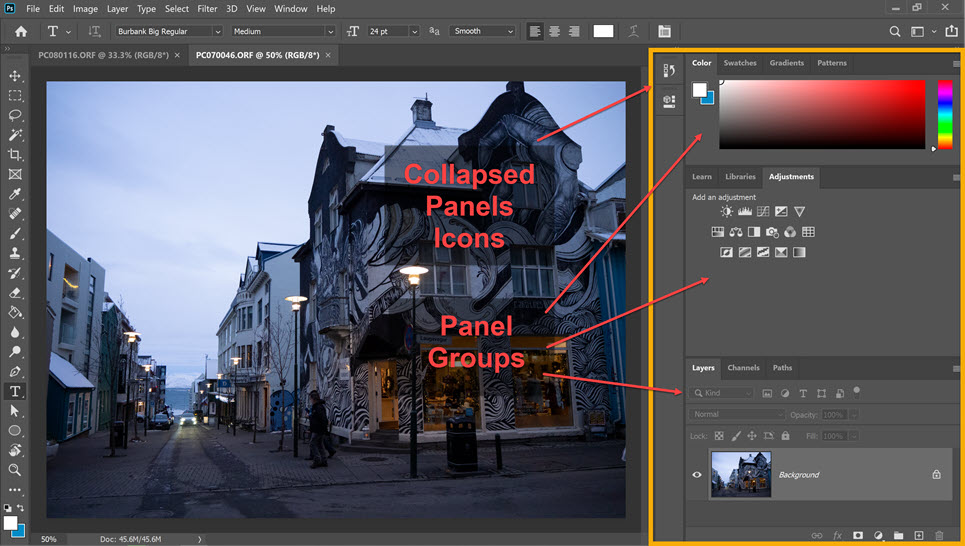
Hide All The Panels In One Go
To get a better view of your image, you can hide all open panels in one go by pressing the Tab key.To see them again, press Tab again. When you hit the Tab key, the Tool Options bar at the top of the screen and the Tools and all the open panels are hidden.
This gives you an uncluttered view of your image.

Press Shift + Tab to hide all the panels except the Tool Options bar and Toolbar.

How To Rearrange Panels
By default, Panels sit on the right-hand side of the Photoshop workspace, but we can rearrange their location and their groupings to our own liking.Make A Panel Appear At The Front Of A Group
Panels are grouped together, for example, Layers, Channels and Paths are a default group. To make a panel appear at the front of its group, click on that panels name tab.
Move A Panel Out of a Group
To move a panel out of its group, click on the Panel Tab name, for example, Layers, and drag the tab away from the group.
An outline of the Layers panel will appear as you drag. Drop the panel wherever you want on the screen

The Layers panel is now floating by itself, no longer part of its former group of panels.
Move A Panel from One Group to Another
To drag a panel from one group to another group, click on the panel Tab and drag it to that group.As you drag the panel over the group, a blue line will appear around the group.
This indicates that the panel you are dragging will become a part of that group.
Collapse A Panel or Group Of Panels
To keep a panel or a group of panels on the interface but reduce the amount of space it takes up,
we can collapse them to an icon or group of icons. Click on the double arrow at the top of the panel or panel group to minimise.

To expand the group again, click on the double arrow and it will expand back to normal size. To expand a single panel, simply click on the icon or the double arrow.
Resize A Panel Or Panel Group
To resize a Photoshop Panel or Panel Group, move your cursor over the right edge, or bottom edge, or corner. The cursor changes to a double arrow and you can click and drag the edge to resize.

Panel Menus
Most Photoshop panels contain a context-sensitive menu. You open the menu by clicking on the three lines in the upper right corner.In the example below, you can see all the menu options which are available when working with the Character panel
If you clicked on the Paragraph panel tab to make it active, and then clicked on the menu, you would get a completely different set of menu options.

Where To Find All Panels In Photoshop
If you are looking for a panel and can’t currently see it on your screen, click on the Window menu and then choose the panel you are looking for from the list. The complete list of panels appears on the Window menu. A correct mark indicates that panel is currently open or visible on the interface.

Close a Panel
Click on the X in the upper right corner of the panel.Try It Out Yourself:
Spend a few minutes playing around with the panels. Rearrange the groups so that you have some panels floating by themselves,and other groups with 4 or 5 different panels in each group.
Try opening some panels from the Window menu and try closing some panels that are currently open. It’s ok to make a mess of your workspace!
How To Save Your Customised Workspace In Photoshop
After you’ve rearranged and set up your workspace just the way you want it, you can save this configuration as a new workspace.Choose Window > Workspace > New Workspace.
- Type a name for your workspace.
- As well as saving your panel setup, you can choose additional options under Capture. You can save Keyboard shortcuts, Menus and the Toolbar location

Photoshop offers several preset workspaces which modify which panels are visible.
Presets include Essentials – which is the default workspace, 3D, Graphic & Web, Motion, Painting and Photography.
To pick a workspace preset aimed at photographers or retouchers:
Choose Window > Workspace > Photography.
How To Reset Your Photoshop Workspace
If you’d like to get your workspace back to how it looked when you first opened Photoshop, you can simply reset it. To do that, choose Window > Workspace > Reset (Workspace).Now you know (almost) everything you need to be a whizz working with Photoshop panels.
*****************************************************************************************************
I'm not too happy about the way I laid out this tutorial but It is what It is.
The others will be better, I promise. 3D images/graphics and make it come to life
and actually move in a video in someway, my next tutorial will have something to do with that,
while still posting more PhotoShop tuts.
Anyway my Family, I hope someone gets something out of this
Big Hugzzzzz and love to you all.

")
