Chuck
🤴 Super Admin
- Downloaded
- 300.6 GB
- Uploaded
- 2.9 TB
- Ratio
- 9.91
- Seedbonus
- 589,896
- Upload Count
- 24 (26)
Member for 5 years
Some of the custom OS offered here at TeamOS will not load into a virtual machine but some can be made to by modifying the ISO file.
I used ImgBurn to do this but you could use the information in this guide to do the job with most other apps capable of making a bootable ISO.
* Extract the custom ISO into a temporary folder, let's call it c:\makeBootable. You can use Winrar, 7zip, PowerIso etc.
* Get and load ImgBurn. It is free software. Google it.
* Click the 'Write files/folders to disc' button.
* Add the installation source folder (c:\makeBootable) to the 'Source' box. Add just the root folder as it gets the subfolders automatically.
* Enter a destination for the modified ISO which can be a DVD or an ISO file.
In my eaxmple I'm writing to G:\modifiedISO.iso, a USB memory device.
If you have trouble entering the destination then click the "Switch to advanced input" button. (red arrow in the image)
* Switch to the 'Advanced' tab, and then to the 'Bootable Disc' one.
* Enable the 'Make Image Bootable' option.
* Set the 'Emulation Type' to 'None (Custom)'.
* Point the 'Boot Image' to the 'etfsboot.com' file within the 'boot' folder in your source folder - i.e. "c:\makeBootable\boot\etfsboot.com"
* Set the 'Platform ID' to '80x86'.
* Enter 'Microsoft Corporation' in the 'Developer ID' field.
* Enter '07C0' in the 'Load Segment' field.
* Enter '4' in the 'Sectors To Load' field if your etfsboot.com file is 2K in size, enter '8' if it's 4K.
Note: For Windows 7/8/ 10 etfsboot.com is normally 4KB, so enter 8. (Basically it's the size of the file in bytes divided by 512 - i.e. 2048 / 512 = 4)
* You should now see something like this
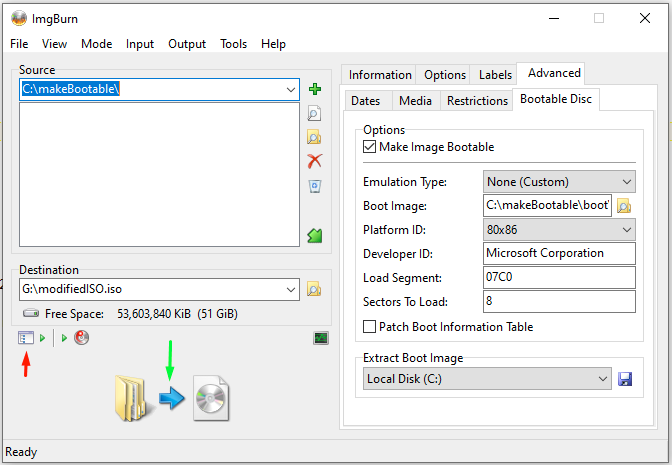
* Click the 'Build' button to make a bootable ISO. (green arrow in the image)
* Assuming your source folder is in order, the program may prompt you to correct certain things so they match (as closely as possible) an official Microsoft disc image.
* If you see "You've only selected 1 folder", click "Yes".
* Change the volume label for the new ISO if you want to.
* When you are sure that your new ISO works then you can delete the source folder.
For me, using my new PC and ridiculously expensive fast memory stick, the build takes less than a minute for a superlite OS.
IMPORTANT NOTE:
This method will not make every custom OS work on a VM, especially if the install.wim or install.esd file has been modified.
If it doesn't work for you then double check that you followed the instruction correctly.
Then try both the BIOS and UEFI options in your VM configuration.
If it still doesn't work, and you are confident that it's not a VM configuration problem, then I recommend that you try another OS; we have plenty to choose from.
If you won't give up then you could try copying in an install.wim or install.esd from another OS ISO file, but that's beyond the scope of this quick guide.
Please do not ask the uploader of the OS for help. They have more than enough work already.
Thanks to parvinder 2018 for making me aware of this workaround.
I used ImgBurn to do this but you could use the information in this guide to do the job with most other apps capable of making a bootable ISO.
* Extract the custom ISO into a temporary folder, let's call it c:\makeBootable. You can use Winrar, 7zip, PowerIso etc.
* Get and load ImgBurn. It is free software. Google it.
* Click the 'Write files/folders to disc' button.
* Add the installation source folder (c:\makeBootable) to the 'Source' box. Add just the root folder as it gets the subfolders automatically.
* Enter a destination for the modified ISO which can be a DVD or an ISO file.
In my eaxmple I'm writing to G:\modifiedISO.iso, a USB memory device.
If you have trouble entering the destination then click the "Switch to advanced input" button. (red arrow in the image)
* Switch to the 'Advanced' tab, and then to the 'Bootable Disc' one.
* Enable the 'Make Image Bootable' option.
* Set the 'Emulation Type' to 'None (Custom)'.
* Point the 'Boot Image' to the 'etfsboot.com' file within the 'boot' folder in your source folder - i.e. "c:\makeBootable\boot\etfsboot.com"
* Set the 'Platform ID' to '80x86'.
* Enter 'Microsoft Corporation' in the 'Developer ID' field.
* Enter '07C0' in the 'Load Segment' field.
* Enter '4' in the 'Sectors To Load' field if your etfsboot.com file is 2K in size, enter '8' if it's 4K.
Note: For Windows 7/8/ 10 etfsboot.com is normally 4KB, so enter 8. (Basically it's the size of the file in bytes divided by 512 - i.e. 2048 / 512 = 4)
* You should now see something like this
* Click the 'Build' button to make a bootable ISO. (green arrow in the image)
* Assuming your source folder is in order, the program may prompt you to correct certain things so they match (as closely as possible) an official Microsoft disc image.
* If you see "You've only selected 1 folder", click "Yes".
* Change the volume label for the new ISO if you want to.
* When you are sure that your new ISO works then you can delete the source folder.
For me, using my new PC and ridiculously expensive fast memory stick, the build takes less than a minute for a superlite OS.
IMPORTANT NOTE:
This method will not make every custom OS work on a VM, especially if the install.wim or install.esd file has been modified.
If it doesn't work for you then double check that you followed the instruction correctly.
Then try both the BIOS and UEFI options in your VM configuration.
If it still doesn't work, and you are confident that it's not a VM configuration problem, then I recommend that you try another OS; we have plenty to choose from.
If you won't give up then you could try copying in an install.wim or install.esd from another OS ISO file, but that's beyond the scope of this quick guide.
Please do not ask the uploader of the OS for help. They have more than enough work already.
Thanks to parvinder 2018 for making me aware of this workaround.
Last edited:
")